How to Harvest Rainwater on Small Acreage for Livestock and Gardens
Why Rainwater Harvesting Makes Sense on Small Acreage
Running a well pump for livestock water and garden irrigation adds up fast. On a 5 to 20-acre property, the combination of electric costs, well maintenance, and the risk of running low during August drought makes a secondary water source worth serious consideration. Rainwater harvesting gives you a free, gravity-fed supply that requires no ongoing energy cost once infrastructure is in place.
The math works strongly in your favor in most of the eastern United States. A single inch of rainfall on a 1,500-square-foot metal roof yields roughly 900 gallons of collectible water — enough to water a small beef cow for 10 to 12 days or irrigate a 1,000-square-foot garden multiple times over. Even in semi-arid regions that receive 20 inches of annual rainfall, a modest collection setup can accumulate 15,000 to 20,000 gallons per year.
This guide covers site assessment, tank sizing, gutter and filtration setup, and the practical steps to get water moving from your roof to where you need it.
Step 1 — Calculate Your Collection Potential
Before buying a single tank or fitting, estimate what your roof can actually deliver. The formula is straightforward:
Collection volume (gallons) = Roof area (sq ft) × Rainfall (inches) × 0.623
The 0.623 factor converts square feet and inches to gallons and accounts for a typical 10 percent loss from evaporation, splashing, and first-flush diversion.
Walk your outbuildings and do the math on each roof:
- 40 × 60 metal barn (2,400 sq ft): 1 inch of rain = 1,495 gallons
- 20 × 40 equipment shed (800 sq ft): 1 inch of rain = 498 gallons
- Farmhouse with 1,600 sq ft footprint: 1 inch of rain = 997 gallons
Add up your available roof area across all structures. Even modest collection surfaces add up quickly. A 30-acre property with two outbuildings and a residence often has 5,000 or more square feet of collectible roof area — enough to fill a 5,000-gallon tank in 2 to 3 good rain events.
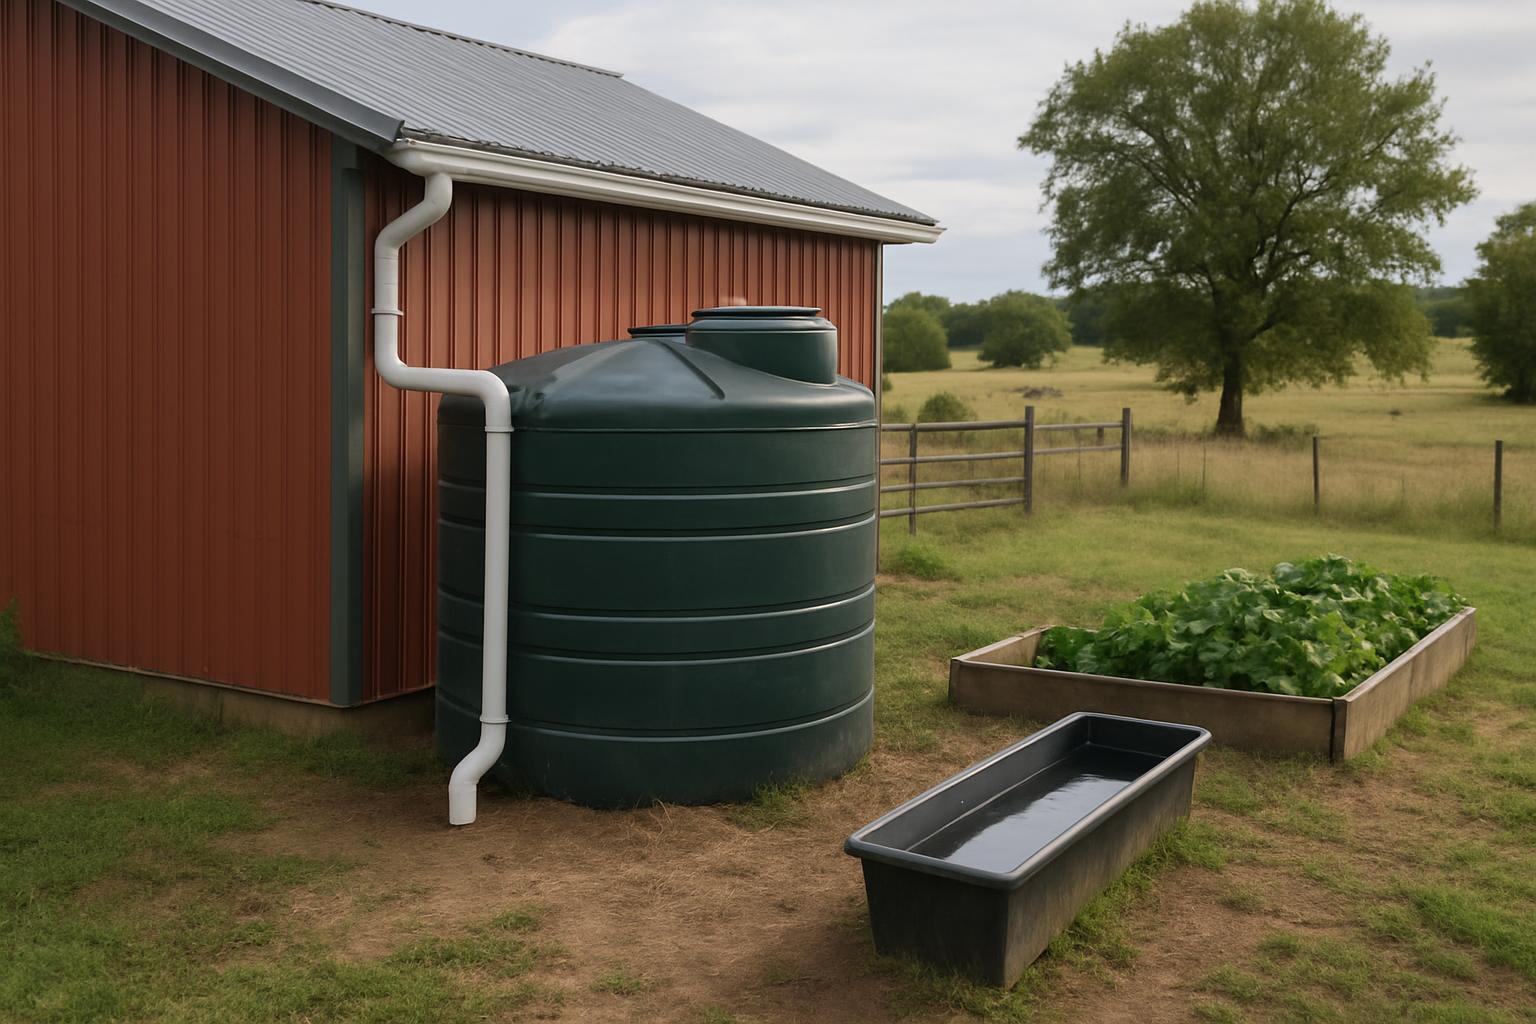
Step 2 — Choose the Right Storage Tank
Tank selection depends on your budget, intended use, and whether you need the system to be portable or permanent.
Poly tanks (250 to 2,500 gallons): The most practical option for most small acreage setups. Food-grade poly tanks cost $0.30 to $0.80 per gallon of capacity, are UV-resistant, and can be repositioned with a tractor or skid steer. A 1,000-gallon tank runs $300 to $600 from farm supply distributors or used from food processing operations (common for $0.10 to $0.20 per gallon).
IBC totes (275 or 330 gallons): Intermediate bulk containers sold used by chemical or food companies for $50 to $150 each. Stack two on a pallet frame to create a 550 to 660-gallon gravity-fed system for under $400. The trade-off is exposure — IBC totes are often translucent, which promotes algae growth unless painted or covered.
Corrugated steel tanks (1,500 to 10,000 gallons): Permanent installations that work well as the primary storage for livestock watering. A 5,000-gallon corrugated steel tank with liner costs $800 to $2,000 installed, and will outlast poly tanks by decades. Requires a level gravel pad and permanent plumbing.
For a first system on 5 to 20 acres, a pair of 1,000-gallon poly tanks — one per major roof — gives you flexibility without a large upfront investment.
Step 3 — Set Up Gutters and Downspouts for Maximum Collection
Metal outbuilding roofs often have no gutters at all, or gutters that drain nowhere useful. Adding or redirecting gutters is typically the highest-leverage improvement you can make to a rainwater system.
Gutter sizing: For a barn roof, use 6-inch K-style gutters rather than the 5-inch gutters common on residential buildings. A 6-inch gutter handles 50 percent more flow during heavy rainfall — critical when a thunderstorm drops half an inch in 20 minutes and your roof sheds it all at once.
Downspout placement: Position downspouts within 10 feet of your tank inlet to minimize pipe runs. Each horizontal foot of pipe that water must travel increases the chance of debris accumulation and overflow during heavy rain. Use 3-inch or 4-inch downspouts rather than standard 2-inch — larger diameter means less clogging.
First-flush diverters: The first few minutes of rainfall washes bird droppings, dust, leaf debris, and insect waste off your roof. A first-flush diverter is a simple pipe assembly that captures and discards the first 10 to 20 gallons of runoff before directing clean water to your tank. For a livestock or garden system, install one on every downspout. They cost $30 to $60 each in materials or can be fabricated from 4-inch PVC for under $20.
Step 4 — Filter and Protect Your Storage
Water that enters your tank will contain some particulate matter regardless of first-flush diversion. Basic filtration protects your pumps, prevents tank fouling, and keeps water suitable for livestock and irrigation.
Inlet screen: Mount a 30 to 60-mesh stainless screen over every tank inlet. This blocks leaves, insects, and coarse debris before it reaches stored water. Check and clean the screen every 2 to 3 rain events.
Tank venting: Every sealed tank needs a screened vent to allow air exchange as water levels rise and fall. Without proper venting, tanks can collapse under negative pressure. Use a 3/4-inch brass or stainless vent fitting with a 30-mesh screen to keep mosquitoes out.
Mosquito control: Standing water breeds mosquitoes unless the tank is fully sealed. If you use open-top tanks or corrugated steel tanks without tight lids, add Bti dunks (Bacillus thuringiensis israelensis) — a biological mosquito larvicide safe for livestock and wildlife. One dunk per 100 gallons of surface area, replaced monthly through warm months.
Overflow management: Every tank needs an overflow outlet sized to handle the maximum flow rate from your roof. Position overflow to drain away from structures and toward a vegetated area or secondary storage. An unmanaged overflow undermines your tank pad and erodes the soil around your system.
Step 5 — Distribute Water to Livestock and Gardens
Once water is stored, getting it to where you need it requires some planning around elevation and pressure.
Gravity-fed systems: Position your tank on elevated ground — or on a platform raising it 3 to 4 feet above grade — to create usable pressure without a pump. Every foot of elevation head produces about 0.43 PSI of pressure. A tank elevated 8 feet delivers roughly 3.5 PSI at the outlet, which is adequate for drip irrigation and gravity-fill troughs but insufficient for sprinkler systems.
For livestock troughs: Run a 1-inch or 3/4-inch poly pipe from the tank outlet to a float-valve-equipped trough. The float valve maintains the trough at a set level and shuts off flow when full — identical to how your household toilet tank works. This setup requires no electricity and can operate indefinitely without attention as long as the storage tank has water.
For garden drip irrigation: A gravity-fed system at 3 to 5 PSI runs most drip emitter systems adequately. Connect your tank outlet to a drip manifold with a fine-mesh inline filter (150-mesh) to protect emitter orifices from sediment. Drip systems under gravity pressure require less filtration precision than pressurized systems because flow rates are naturally lower.
Pump-assisted distribution: If gravity isn't feasible, a 12-volt DC pump powered by a small solar panel gives you an off-grid pressurized system. A 100-watt panel and 12V pump rated for 5 GPM at 30 PSI costs $150 to $300 in components and handles most small-scale irrigation and trough filling needs.
Key Takeaways
- A 1,500-square-foot barn roof yields roughly 900 gallons per inch of rainfall — calculate your actual collection potential before sizing tanks.
- Food-grade poly tanks (1,000 gallons) or used IBC totes offer the best cost-per-gallon for most small acreage setups.
- Install 6-inch gutters and 3-inch downspouts on outbuildings to handle heavy rainfall without overflow losses.
- First-flush diverters on every downspout remove the dirtiest runoff before it reaches your storage tank.
- A tank elevated 8 feet above grade produces enough gravity pressure to fill livestock troughs and run drip irrigation without any pump.
- Screen all inlets and vents, manage overflow deliberately, and add Bti dunks to open tanks to prevent mosquito breeding.
Stop Seeing Deer Only at 2 AM — Get the Free 10-Point Habitat Fix
Your property has specific, fixable gaps — and most 1–50 acre hunters never find them. This free checklist pinpoints exactly what's missing and tells you what to change first so deer start showing up when you can actually hunt them.
- ✓ The food plot timing that pulls deer into daylight hours
- ✓ How to build bedding cover with just a chainsaw (no equipment needed)
- ✓ Stand placement mistakes silently blowing out your property
- ✓ The #1 pressure rule most hunters skip — and deer remember
- ✓ Low-pressure access routes most small acreage owners never plan