How to Soil Test Your Small Acreage Pasture and Fix What You Find
Why Most Small Acreage Pastures Underperform
If your pasture has thin stands, weedy patches, or grass that greens up late and burns out early, the odds are high that the problem starts underground. Most small acreage pastures haven't been tested in years — or ever — and are running on depleted soil that can't support dense, competitive grass.
The fix is almost never "seed more." Grass seeded into low-pH, calcium-deficient, or phosphorus-starved soil performs poorly regardless of variety or seeding rate. You're spending money on seed and fertilizer that can't do its job because the foundation is broken.
A soil test changes this completely. For $15 to $25 through your county extension office (or about $30 through a private lab), you get a detailed breakdown of your soil's pH, major nutrients, and organic matter — plus specific lime and fertilizer recommendations written for your intended use. It's the single highest-return investment you can make before spending a dollar on inputs.
This guide walks through the full process: how to pull a proper sample, how to read what comes back, and exactly what to do with the results on 1 to 20 acres of pasture.
Step 1 — Pull Samples the Right Way
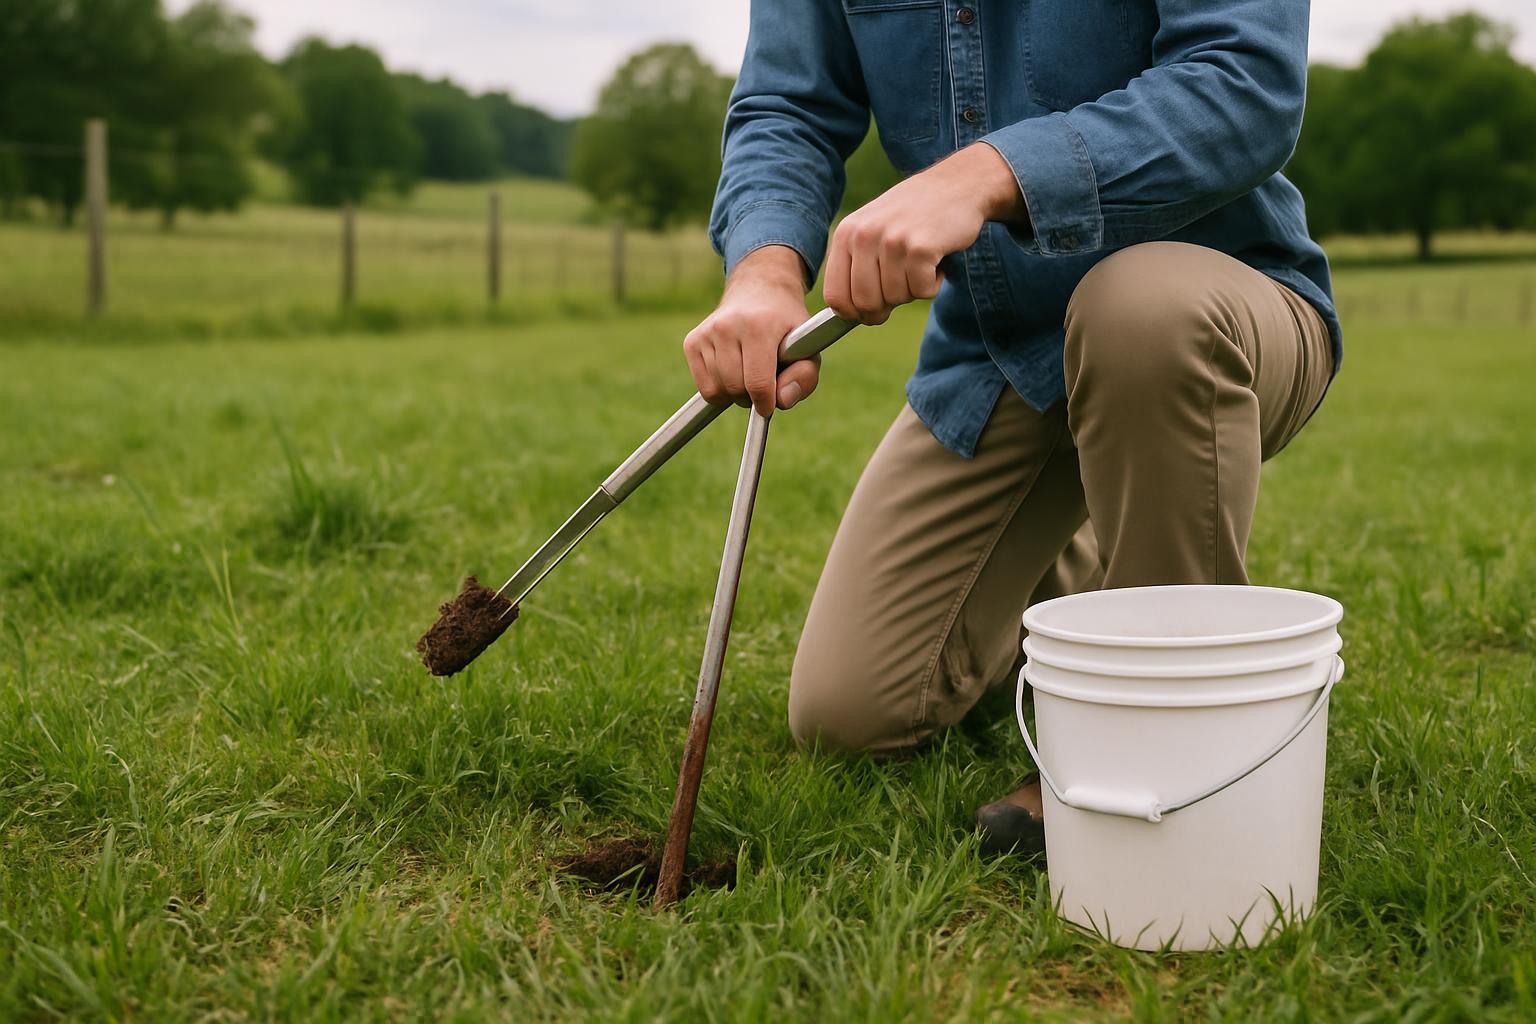
A soil test is only as good as the sample. A poorly pulled sample — too shallow, from a single spot, or taken near a fence line or old hay pile — gives you misleading numbers that send you in the wrong direction.
How to pull a proper composite sample:
Divide your property into management zones based on how the land is used and how uniform it looks. A 10-acre pasture that's all flat and has been managed consistently can be treated as one zone. A property with wet low spots, sandy high ground, and shaded areas near tree lines should be broken into two or three separate zones, each sampled independently.
For each zone, collect 15 to 20 individual cores using a soil probe, clean spade, or soil tube. Pull each core to a depth of 4 inches for pasture (not 6 to 8 inches — that depth is for row crops). Walk a zigzag pattern across the zone as you collect cores to capture variability across the area.
Knock all cores from one zone into a clean plastic bucket. Remove any surface thatch, roots, or rocks. Mix the cores thoroughly, then scoop out about 1 cup of the blended soil. This composite sample represents the entire zone.
Label each sample clearly — "North Pasture", "Wet Corner", "Front Field" — and note what you're growing and your management goal (established pasture, new seeding, hay production). This information shapes the lab's recommendations.
What to avoid:
- Don't sample right after fertilizing or liming — wait at least 6 weeks
- Don't sample from wet soil — let it dry to crumbly before pulling cores
- Avoid old fence lines, sacrifice areas, and spots where animals congregate — these give falsely elevated nutrient readings
Step 2 — Choose a Lab and Submit
County extension offices are the easiest starting point. Most charge $15 to $25 per sample and return results in 1 to 2 weeks. The recommendations are calibrated to your state's soils and typical input costs, which makes them practical to act on. Call ahead to confirm submission requirements — some want samples mailed, others accept walk-ins.
Private labs (A&L Great Lakes, Ward Laboratories, Logan Labs) typically charge $20 to $40 per sample and offer faster turnaround plus more detailed testing options. If you want organic matter percentage, sulfur, or micronutrient panels, private labs are usually the better choice. Results from private labs sometimes require more interpretation since recommendations aren't always region-specific.
For most small acreage pasture situations, the county extension lab is the right call. The recommendations are written in plain language and calibrated for local conditions.
Step 3 — Read the Results
When your report comes back, focus on three numbers first: pH, phosphorus (P), and potassium (K). These drive the majority of decisions on pasture ground.
Soil pH (target range: 6.0–6.8 for most cool-season grasses)
pH controls how available nutrients are to plant roots. At pH 5.5, even soil that's loaded with phosphorus can't deliver it effectively — the chemistry locks it up. Most pasture problems that look like fertility problems are actually pH problems in disguise.
If your pH is below 6.0, the first and most important input is lime. The lab will tell you how many tons per acre you need to reach target pH. Apply calcitic or dolomitic ag lime based on whether your magnesium levels are already adequate (dolomitic adds magnesium; calcitic does not).
Lime takes 6 to 12 months to fully neutralize soil acidity, so don't expect immediate results. Apply in fall or early spring and give it a full growing season before re-testing.
Phosphorus (target: medium to high for established pasture)
Low phosphorus is the second most common deficiency in small acreage pastures. Phosphorus supports root development, stand establishment, and legume growth. If your level tests low, the lab will recommend a starter phosphorus application — typically 60 to 100 lbs per acre of P2O5 in the form of 0-46-0 (triple super phosphate) or 18-46-0 (diammonium phosphate).
Potassium (target: medium for grass pasture, higher for legume mix)
Potassium is especially critical if you're cutting hay, since each cutting removes significant K from the field. Low potassium shows up as grass that looks stressed in dry periods and doesn't recover quickly after cutting. The lab's recommendation will account for your intended use.
Nitrogen is typically not included in basic soil tests because it's too mobile and variable to measure meaningfully. Nitrogen applications for pasture are managed separately based on forage production goals and grass species.
Step 4 — Build Your Input Plan
Once you have your results, sequence your inputs logically. Lime always comes first if pH needs correction — there's no point applying fertilizer until the chemistry is right to use it.
Year 1 priority: Get pH right
If pH is below 6.0, apply the recommended lime rate. On 5 acres, a 2-ton-per-acre recommendation means 10 tons of lime. Local ag lime is typically $30 to $50 per ton delivered and spread, putting the total at $300 to $500 — less than a single bag of grass seed per acre in cost impact.
Broadcast spreaders, either tractor-mounted or pull-behind, apply lime evenly at the right rate. Most farm supply stores rent spreaders for $50 to $100 per day if you don't own one.
Year 1 secondary: Address major deficiencies
If the lab shows low phosphorus or potassium alongside the pH problem, apply both at the same time as the lime. There's no benefit to waiting — and if you're doing a new seeding, phosphorus at seeding time gives the best return.
Year 2 and beyond: Maintenance applications
Once pH and major nutrients are in range, most established pastures need only maintenance nitrogen (50 to 100 lbs of actual N per acre per year, split-applied) and periodic phosphorus and potassium based on re-tests every 2 to 3 years.
On 10 acres of pasture, annual nitrogen runs roughly $80 to $150 using urea (46-0-0) at the right rate — modest cost for the stand quality improvement you'll see.
Step 5 — Re-Test on a Schedule
Soil health changes. Lime breaks down over 4 to 6 years. Hay cutting removes nutrients continuously. Amendments applied incorrectly can push levels too high in one spot.
Pull a soil test every 2 to 3 years on established pasture. If you're making major changes — new seeding, introduction of legumes, switching from hay to grazing — test before and after to track what changed.
Keep your results filed together with the dates and what inputs you applied. After two or three test cycles, you'll start to see your soil's patterns — which fields need lime faster, which areas stay high in potassium — and can adjust your inputs accordingly.
Most small acreage landowners who test consistently end up spending less on fertilizer, not more, because they stop buying inputs they don't need.
Key Takeaways
- Pull 15 to 20 soil cores per management zone at 4-inch depth, mix them, and submit a 1-cup composite to your county extension lab for $15 to $25 per sample.
- pH is the first number to fix — most pasture fertility problems are really pH problems in disguise. Target 6.0 to 6.8 for cool-season grasses.
- Apply lime before fertilizer; lime takes 6 to 12 months to work, so corrections made in fall or early spring show up in the following growing season.
- Address low phosphorus and potassium in the same application cycle as lime — don't wait until pH is corrected to deal with major deficiencies.
- Re-test every 2 to 3 years. Consistent testing lets you stop buying inputs your soil doesn't need and start spending only on what actually moves the needle.
- Keep your test results and input records together — the pattern across 3 to 4 test cycles tells you more than any single result.
Stop Seeing Deer Only at 2 AM — Get the Free 10-Point Habitat Fix
Your property has specific, fixable gaps — and most 1–50 acre hunters never find them. This free checklist pinpoints exactly what's missing and tells you what to change first so deer start showing up when you can actually hunt them.
- ✓ The food plot timing that pulls deer into daylight hours
- ✓ How to build bedding cover with just a chainsaw (no equipment needed)
- ✓ Stand placement mistakes silently blowing out your property
- ✓ The #1 pressure rule most hunters skip — and deer remember
- ✓ Low-pressure access routes most small acreage owners never plan