How to Build a Cattle Water Gap That Actually Holds
What Is a Water Gap and Why It Matters
A water gap is the section of fence that crosses a creek, drainage ditch, or seasonal draw. It's one of the most vulnerable spots on any rural property fence line. When water rises, debris piles against the fence and the force can tear out posts, wash away the bottom rail, and leave a gap wide enough for cattle to walk through or predators to slip in.
Getting water gaps right means fewer fence repair emergencies after every heavy rain. It also means livestock stay where they belong and your perimeter holds through the wet season without constant babysitting.
This guide covers the materials, placement logic, and construction approach that rural landowners use to build water gaps that survive real weather.
Choosing the Right Location
Before you drive a single stake, walk the crossing at different water levels if you can. Look for these features in a good water gap site:
Narrow crossings with stable banks. A crossing that's 8 feet wide beats one that's 20 feet wide. Narrower crossings mean less fence exposed to debris load and current pressure. Stable banks resist undercutting and hold your anchor posts firmly.
Rocky or firm bottom. Soft, sandy creek bottoms shift with every flood. A firm gravel or rock bottom gives you a stable reference point for your bottom barrier and keeps the gap from migrating over time.
Straight channel approach. Avoid crossing at bends where the current cuts hard into one bank. A straight run means water flows through more evenly and debris is less likely to pile on a single side.
If you have no choice but a wide, soft-bottomed crossing, plan your construction accordingly — you'll need more robust anchoring and expect more maintenance.
Materials You'll Need
For a standard cattle water gap across a small to medium creek, gather the following:
- 2–3 corner posts or heavy treated wood posts (6 inch diameter or larger, 8 feet long)
- Heavy duty T-posts for the bottom section (shorter, 5–6 foot)
- Woven wire or high-tensile wire for the main fence panels
- Heavy gauge smooth wire or chains for the bottom "floating" section
- Cable or heavy wire for the top deadman anchor
- Large galvanized staples, wire clips, and fence stretching tools
- Concrete or large rocks for post setting (if soil is loose)
- Safety wire or log chain to attach the floating section to anchors
Some landowners use old tire casings, heavy gauge wire panels, or cable in the bottom floating section. The key is that the bottom section can give way under flood pressure without destroying the whole fence — and then swings back into place when the water drops.
Setting the Anchor Posts
The two anchor posts — one on each bank — carry the entire load of the water gap. Skimp here and everything else fails.
Set them deep. In firm soil, 3.5 to 4 feet of depth is the minimum. In sandy or loose soil, go deeper or use concrete. These posts need to handle lateral pressure from debris loads, not just the weight of the fence.
Angle them back from the creek. Drive each post at a slight backward angle away from the water — maybe 5 to 10 degrees. This helps the post resist the pull of the fence and the push of flood debris rather than working against both forces.
Brace the anchor posts. A proper H-brace or deadman brace behind each anchor post is worth the extra hour of work. Tie the top of the anchor post back to a buried deadman (a horizontal post buried 3 feet deep) with heavy wire or cable. This transfers the load into the ground rather than relying solely on post depth.
Building the Permanent Upper Section
The upper section of the water gap — above the expected flood line — is built like a standard fence. Stretch your woven wire or high-tensile wire from bank to bank, staple it to the anchor posts, and set any intermediate posts you need to keep the fence from sagging across the span.
Keep this section tight and permanent. It won't see floodwater under normal conditions and doesn't need to flex. Height should match the rest of your fence line — typically 4 to 5 feet for cattle.
Mark the flood line based on debris you see in the brush above the creek bank. Anything below that line is your floating section territory.
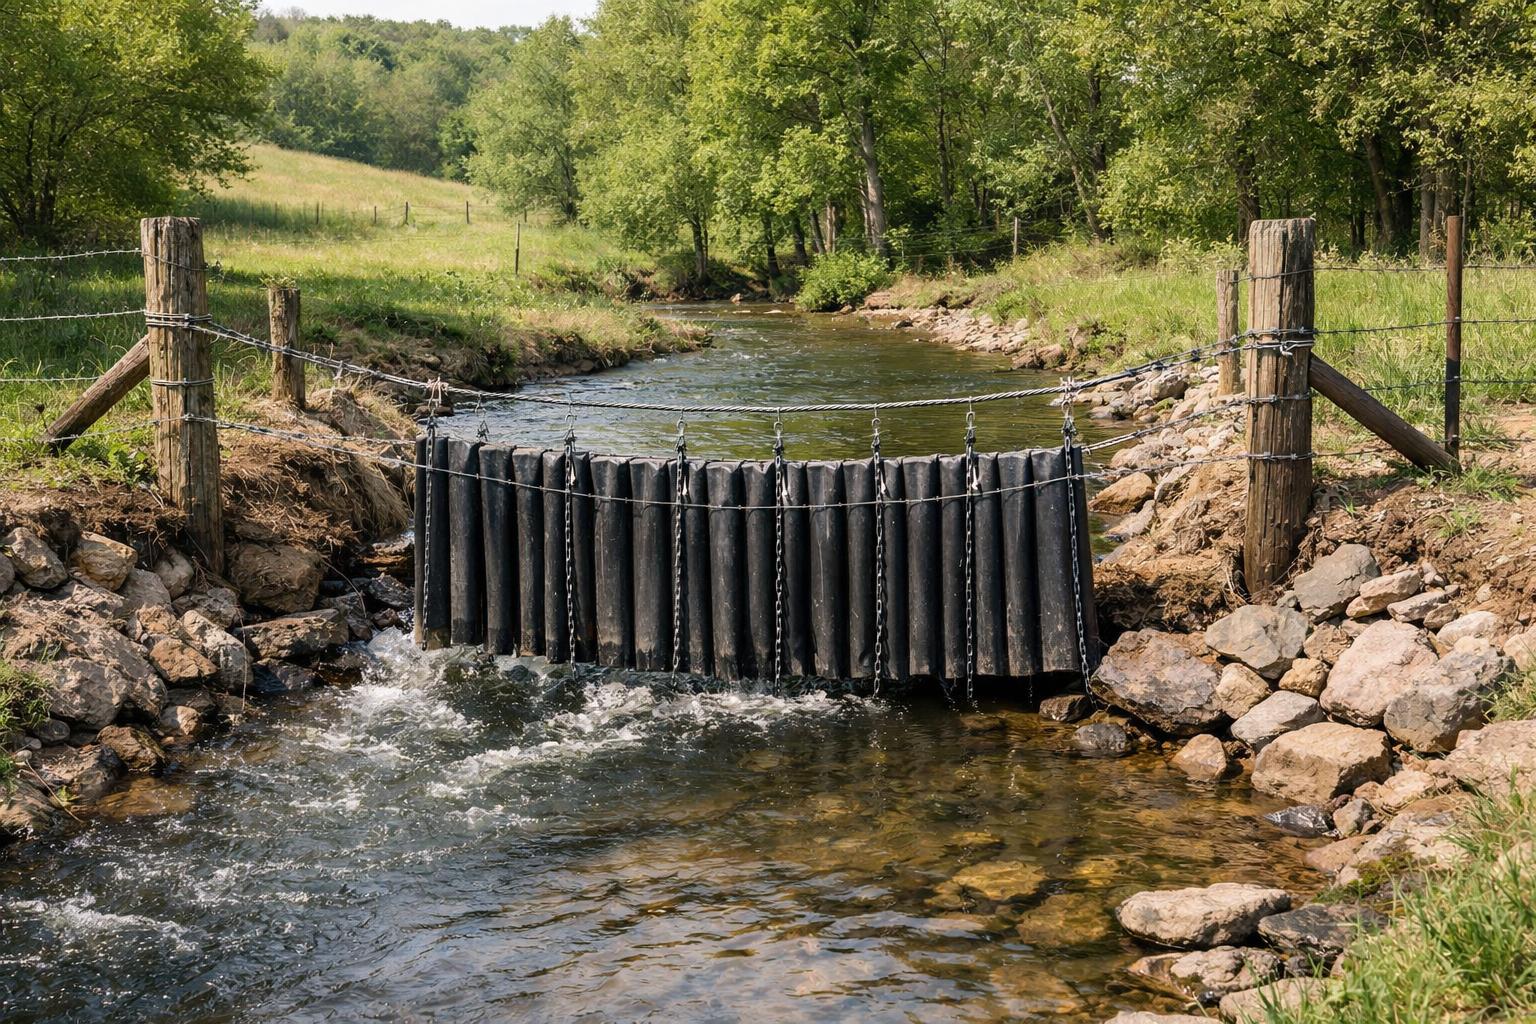
Installing the Floating Bottom Section
The floating bottom section is what makes a water gap survive floods instead of getting destroyed by them. The concept is simple: this section is attached at the top but free to rise with floodwater. Debris pushes against it, but instead of ripping out posts, the whole section lifts, lets the debris through, and drops back down when the water recedes.
Construction steps:
- Attach a length of heavy wire panel, woven wire, or cable assembly to the bottom of the permanent section using wire clips or chain links that allow the bottom to pivot upward.
- Add weight to the bottom edge — rocks wired on, old farm chain, or scrap metal — so the bottom section sinks back down against the creek bottom when water drops.
- Connect the floating section to the anchor posts with slack cable or chain, not tight wire. The slack is what allows it to rise. Typically 2 to 3 feet of slack is enough for most crossings.
- Run a horizontal smooth wire or cable as a bottom guide across the creek bed, just above the normal water level. The floating section rides against this when water is low, sealing the gap against livestock.
The floating section doesn't have to be fancy. Old sections of woven wire, cable salvaged from farm equipment, or even a series of chains hanging vertically all work. The principle matters more than the specific material.
Finishing Details That Prevent Failures
A few extra steps separate water gaps that last from ones that require repair every spring:
Wrap wire ends. Any cut wire end near the creek should be wrapped back on itself and clipped. Sharp wire ends catch debris, which loads the fence during floods.
Clear the channel. Before the first big rain of the season, walk the creek above the water gap and remove any log jams or debris piles that could come loose and hit the fence all at once.
Check tension after the first flood. The first high water event will tell you how the gap is behaving. Look for posts that shifted, wire that stretched or broke, and bottom sections that didn't reseat properly. Make adjustments before the next event.
Mark it with flagging or a post cap. Water gaps are easy to miss during fence walks, especially in summer when vegetation is thick. A simple marker helps you remember to check this section first after any significant rain.
Maintenance Schedule
A well-built water gap in normal conditions needs two inspections per year — once in spring after the wet season and once before winter. Add an inspection after any major flood event. This spring walk pairs naturally with your firebreak maintenance pass — How to Establish a Firebreak on Rural Property covers the same early-spring inspection and mowing schedule for your full property network.
During each inspection:
- Check anchor posts for movement (grab and push hard — they should not rock)
- Verify the floating section reseated fully against the creek bottom
- Look for broken wire or clips where the floating section attaches
- Clear any debris that lodged in the fence wire during the last flood
- Restretch any wire that lost tension
Most water gap repairs are minor if you catch them early. A drifted post or a broken clip fixed in an afternoon beats rebuilding an entire crossing after cattle get out. A maintained creek crossing also keeps wildlife movement predictable — Understanding Deer Bedding Areas on Small Acreage explains how deer use creek corridors as travel lanes between bedding and feeding areas.
When to Call It and Start Over
Some water gap locations are just wrong. If you're repairing the same crossing after every rain event, it's worth evaluating whether the site itself is the problem — too wide, too soft, too much debris coming from upstream. Relocating a crossing 50 feet up or downstream to a better site often ends years of recurring repair costs.
Heavy equipment — a small dozer or excavator — can reshape a creek bank or install a culvert at a chronic problem crossing for a one-time cost that eliminates the annual water gap headache entirely. For high-use pasture divisions, that investment often pays back within a few seasons.
Summary
A reliable cattle water gap requires good site selection, deep anchor posts with proper bracing, a permanent upper section, and a correctly weighted floating bottom section with enough slack to rise in a flood. Built right, it handles flood debris without failing and resets automatically when water drops. The few extra hours spent on solid construction pay back every spring when the fence is still standing after the big rains. If you're also planning water features that work alongside your creek crossings, How to Build a Small Wildlife Pond on Rural Property covers siting, spillway design, and bank management for the same low points your water gaps cross.
Stop Seeing Deer Only at 2 AM — Get the Free 10-Point Habitat Fix
Your property has specific, fixable gaps — and most 1–50 acre hunters never find them. This free checklist pinpoints exactly what's missing and tells you what to change first so deer start showing up when you can actually hunt them.
- ✓ The food plot timing that pulls deer into daylight hours
- ✓ How to build bedding cover with just a chainsaw (no equipment needed)
- ✓ Stand placement mistakes silently blowing out your property
- ✓ The #1 pressure rule most hunters skip — and deer remember
- ✓ Low-pressure access routes most small acreage owners never plan