How to Build a Farm Access Road That Lasts: Grading, Gravel, and Drainage Done Right
Building a farm access road feels straightforward until the first hard rain turns it into a muddy river. Most rural landowners make the same set of mistakes: skipping proper grading, underestimating drainage, and putting down gravel before the subbase is solid. The result is a road that costs money every single year to repair instead of one that serves the property for decades.
This guide covers the full process — from surveying your route to selecting the right gravel — with the specific decisions that separate a road that lasts from one that doesn't. Farm roads are part of a broader land infrastructure investment — Sustainable Farming Techniques for Small-Scale Growers covers water harvesting earthworks and swale design that complement your road's drainage network.
Plan the Route Before You Touch the Ground
The single most important step happens before any equipment rolls. A bad route locks you into problems that no amount of gravel can fix.
Walk the proposed route in wet conditions, ideally after a rain. You want to see exactly where water flows, where it pools, and what natural drainage paths exist. Your road should work with these patterns, not against them.
Follow high ground when possible. Roads built along ridges and high ground shed water naturally. Roads built in low spots become channels for surface runoff and require constant maintenance. If you have to cross a low area, keep that section as short as possible.
Identify all crossing points early. Every creek, drainage ditch, or seasonal wet area needs a plan before you build. Culverts at these crossings are far cheaper to install during construction than after the road is in. Walk each crossing point and note the drainage area upstream — a larger watershed means you need a larger culvert. Where your road crosses near a working fence line, coordinating culvert and water gap construction at the same time saves excavation work — both projects involve similar bank work at the same creek crossing.
Avoid side slopes over 15 percent. Roads cut into steep side slopes erode fast and are expensive to stabilize. If you must go uphill, zigzag across the slope rather than going straight up it. A road that climbs at a 10 percent grade sheds water far better than one that climbs at 20 percent.
Mark your route with stakes before any clearing begins. Take your time here — this is the decision you can't easily undo later.
Clear, Grade, and Build the Subbase Properly
The subbase is the foundation of your road. A gravel surface laid over soft, unstable soil will sink and rut no matter how much material you add on top.
Clear the roadway to full width. A minimum 12-foot-wide travel surface is functional, but 14 to 16 feet gives you room for two vehicles to pass, equipment to maneuver, and shoulders to maintain drainage. Clear vegetation and topsoil from the full roadway width plus two feet on each side.
Remove all organic material. This is the step people skip to save time, and it costs them later. Roots, stumps, leaves, and topsoil compress and decompose, causing the road surface to sink unevenly. Strip everything down to mineral soil.
Crown the road surface. Every road needs a slight crown — a gentle arc from the center down to the edges — so water runs off the surface instead of pooling. A crown of about one inch of fall for every eight feet of width is the standard. On a 16-foot road, the center should be about two inches higher than the edges.
Compact the subbase before adding any gravel. A skid steer or dozer making multiple passes over the native soil will expose soft spots that need to be addressed. Soft spots may need to be excavated and filled with large crushed stone or geotextile fabric before the road gravel goes on.
If the subbase soil is sandy or gravelly and drains freely, you may be able to go straight to your base course. If the native soil is clay or holds water, consider a layer of geotextile fabric between the subbase and base course to prevent mixing and to provide additional load distribution.
Size and Install Culverts Correctly
Undersized culverts fail. Water backs up, overtops the road, and undermines the entire crossing in one storm event. Getting culvert sizing right is not a place to cut corners.
Calculate culvert size based on drainage area. A rough field rule: for every acre of drainage area flowing toward a culvert, you need approximately one square inch of culvert opening. A 200-acre watershed draining to a single crossing needs at least a 15-inch culvert at minimum, and a 24-inch culvert is safer. When in doubt, go one size larger — a bigger culvert costs less than rebuilding a washed-out crossing.
Install culverts on a slight slope. A culvert with no slope will hold sediment and eventually clog. Install culverts with a minimum one percent fall from inlet to outlet so water keeps moving through.
Bury the culvert at the right depth. The top of the culvert should sit at least one foot below the finished road surface. A culvert too close to the surface will crack under equipment loads.
Extend the culvert ends beyond the fill. The culvert should extend at least one foot past the road fill on each side. Short culverts erode at the ends and undermine the road shoulder.
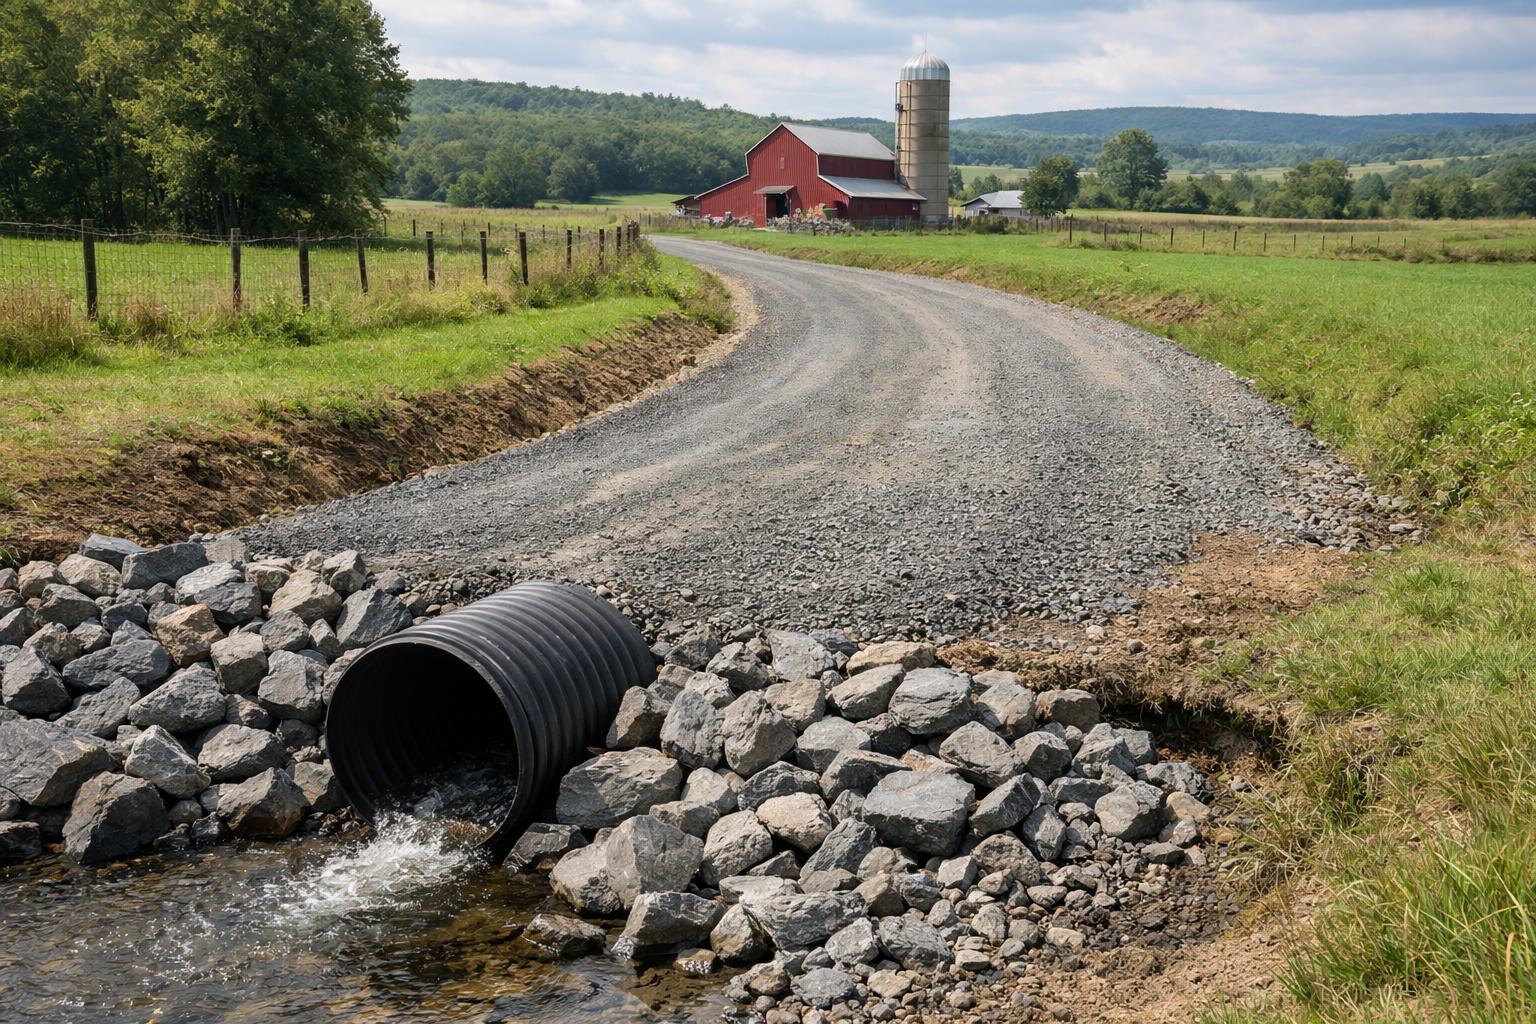
At major crossings where you expect significant flow, add rock or concrete aprons at the culvert outlet to dissipate energy and prevent erosion. A simple dump of large rip-rap stone is often enough.
Choose the Right Gravel and Apply It in Layers
Gravel is not one product. The type and gradation you use determines how well the road performs, how much maintenance it needs, and how long it lasts.
Use a crushed stone base course, not river gravel. Crushed stone has angular edges that lock together under load. Round river gravel rolls and shifts, creating a loose, unstable surface. For base course material, specify a well-graded crushed stone sometimes called "road base," "crusher run," or "dense grade aggregate" depending on your region. This material contains fines that fill voids and compact into a solid mass.
Apply the base course in lifts. Do not dump all your gravel at once. Apply four to six inches, compact it, then add another four to six inches. Compacting in lifts produces a much denser, more stable base than dumping 12 inches at once and running a compactor over the top.
Total base depth depends on soil conditions and expected use. Light truck traffic on stable soil may only need six to eight inches of base. Regular heavy equipment use on marginal soil may need 12 to 18 inches. When in doubt, build deeper — it is far cheaper to add gravel during construction than to rebuild a failed road.
Top with a wearing course. Once the base is compacted and solid, add a two to three inch wearing course of smaller crushed stone, typically three-quarter inch or one inch minus material. This surface is smoother to drive on and easier to maintain.
Maintain It Before Problems Start
A well-built road still needs regular attention. The difference is that maintenance on a properly built road is quick and cheap, not a recurring emergency.
Grade the surface once or twice a year. Gravel migrates over time, pushed to the shoulders by traffic. A box blade on a tractor or a road grader pass will recrown the surface and return gravel to the travel lane. Do this in spring after the ground thaws and again in fall.
Clean ditches and culverts every year. Sediment fills culverts from the bottom, and debris blocks them at the inlet. A plugged culvert can destroy a crossing in a single storm. Check every culvert at the start of the wet season, and clean any that show sediment buildup.
Address soft spots immediately. When a soft spot develops, it grows fast under traffic. Cut out the failed material, add geotextile fabric if the subbase is saturated, and fill with compacted crushed stone. A five-minute repair made early prevents a full reconstruction later.
Add gravel on schedule, not when it looks bad. Most farm roads need a fresh one to two inch layer of wearing course material every three to five years depending on traffic. Waiting until the road looks completely bare means you are already compacting the subbase directly — which accelerates damage.
A farm road built right the first time is one of the best investments you can make in a rural property. Roads built for equipment access often double as firebreak corridors — How to Establish a Firebreak on Rural Property covers how to design cleared strips that serve both access and fire management functions. It makes every other land management task easier, protects your equipment, and adds real value to the land. Take the time to plan the route, build the subbase properly, install adequate drainage, and use the right materials — and you will spend far less time and money fixing problems down the road.
Stop Seeing Deer Only at 2 AM — Get the Free 10-Point Habitat Fix
Your property has specific, fixable gaps — and most 1–50 acre hunters never find them. This free checklist pinpoints exactly what's missing and tells you what to change first so deer start showing up when you can actually hunt them.
- ✓ The food plot timing that pulls deer into daylight hours
- ✓ How to build bedding cover with just a chainsaw (no equipment needed)
- ✓ Stand placement mistakes silently blowing out your property
- ✓ The #1 pressure rule most hunters skip — and deer remember
- ✓ Low-pressure access routes most small acreage owners never plan